
In this brief article, we're going to discuss 10 quick and easy ways to make your Zoom videos the best they can be! These are all easy things you can do to make small adjustments that will have a huge impact on the quality of your Zoom videos, quality that translates into less distractions and improved communication.
1. Practice proper posture
It's always best to begin with the basics. When on a Zoom meeting, be sure to sit at a kitchen table, dining room table, or desk.Contrast that with sitting on a couch, beanbag, futon, or even your bed, which may cause you to sink or slouch. Being seated at a chair helps you to sit upright, which improves how you look on video. Adjust your seating height (if needed, and if possible) so that you aren't hunched down. Good posture contributes to a good video. You may use a small pillow to support your lumbar region, which will help to keep your back straight. When working long hours on a computer, shoulders tend to slouch forward, causing discomfort and pain, and dragging your entire body forward. Remember to bring your shoulders back as far as comfortable.
2. Be aware of your background
Be mindful of what’s behind you as you engage in a Zoom video. A sink full of dirty dishes, your spouse walking by with a basket of laundry, your small children climbing book case behind you, or your dog playing with a chew toy may be huge distractions to your students.
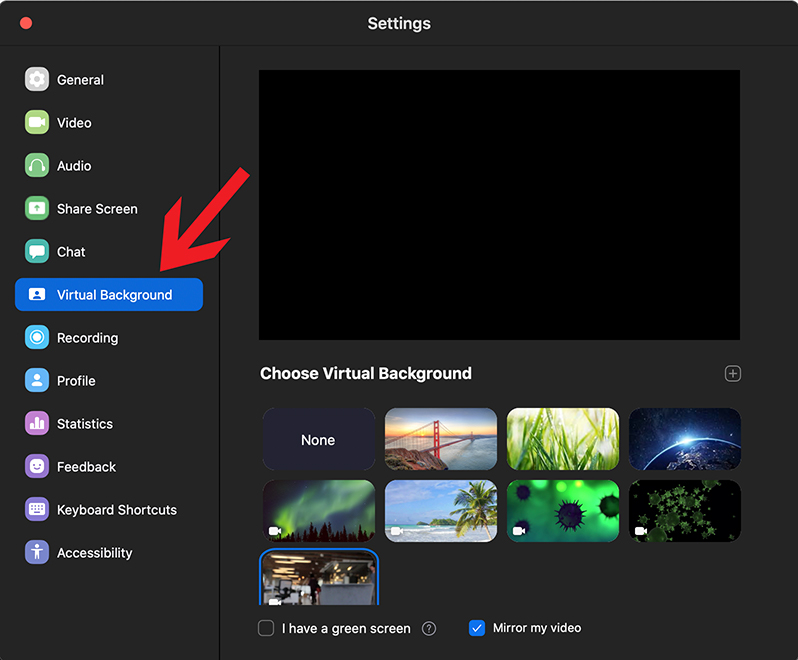
3. Use Virtual Backgrounds
You can use Zoom backgrounds in order to hide your real life background. Virtual backgrounds add interest to your Zoom session. You can also consider using a background that is paired with a learning unit theme. To use virtual backgrounds, access settings by clicking on the gear icon as shown below.

Once in settings, click Virtual Background. Choose on of the default background images to try it out. You can also find and upload custom backgrounds.
If possible, you should consider using an understated background (even a blurred one) as this will focus participant attention on you - best to avoid backgrounds that are too busy or too loud.
If you use virtual backgrounds, ensure that you are in a well-lit room. We'll talk more about lighting in more detail a bit later, but not only will good lighting make your virtual background look better, it will help improve the overall video image.
Another helpful tip is to choose clothing colors which contrast with the virtual background of your choice.
If you use a darker virtual background, be sure to wear lighter clothing. The opposite is true as well. This contrast allows the application to better define the outlines of your face and/or upper body in reference to the background.
*Pro Tip: To download new background images (and videos if your computer supports it) visit a free image site such as Pixabay to find high quality, copyright and royalty free backgrounds. Please note, Zoom backgrounds are limited to 1920 x 1080. Larger file sizes may affect performance, so keep that in mind.
4. Be aware of ambient noise
Related to #2, be aware of the noises that exist around you. While some can't be helped such as street traffic, sirens, etc., be sure to launch your Zoom meeting from a room that doesn't pick up noises emanating from your own home such as the dishwasher, washer and dryer, or the TV that may be on in the other room.
5. Best practices for framing
A good rule of thumb for Zoom video conferences is to show as much of the host as possible, while minimizing the background. The best way to achieve both criteria is to show as much of the host's face as possible. The goal should be to try to fill the frame with your face so that participants can better see your expressions and thereby improve the interpersonal connection between host and participant. This also reduces background distractions. Here are some examples of what your framing should look like. Notice there is a range of acceptability from medium-close-up, to close-up.
Example of medium-close-up. Notice the good contrast between clothing color and background color.
Example of close-up. 
6. It's all about the lighting
We briefly mentioned lighting a bit earlier, but proper lighting is vital to producing a great-looking video, and can make all the difference to how you come across to your audience.
To produce the best videos possible, make sure the area in which you work is well-lit with lights being either front to back or slightly front and the side. You want to avoid being directly below lights and never have lights directly behind you.
If the lighting is directly above you, it will cast harsh, unflattering shadows. If the lighting is directly behind you, it will cause you to appear darker. It's called being "backlit." Both situations should be avoided at all costs.
A backlit situation can occur when you are seated in front of a window with bright sunlight pouring in, or in front of direct light from a lamp or other source emanating from behind.
With proper lighting, even a mid-range laptop camera will produce a better quality image for your participants.
Another problem with lighting affects those who wear glasses. The light source can reflect off the glasses and produce an image that looks like this:

While it's not horrible, the lens glare could be distracting. Test the position of your light source so that you reduce glare and achieve an image that looks more like the picture shown below.
If you wear glasses, it's recommended to position the light source up and to the side (at around 10 o'clock) and if possible, use a light source that diffuses light as much as possible. Household lamps with a lamp shade are good for this purpose. Remember, it doesn't have to be perfect. Just do your best.
7. Positioning the camera
Try to elevate the laptop camera so that it’s looking as straight-on or slightly above eye level as much as possible. This avoids people having to look up your nose and makes your video image more flattering. You can adjust your laptop height using something as simple as a couple of thick books, which will elevate the camera and bring it closer to optimal level.
8. Eye contact
Making eye contact is very important for interpersonal communication. Video conferencing poses a challenge in this area. While the video is on, you will no doubt be looking at your instructional content and at your participant videos. As far as what participants see, you’ll seem to be looking downward the whole time. Just as in real life, it’s good to make occasional eye contact with your students. You can do this by occasionally looking up at the laptop camera. You might even give a smile and use the time to ask a clarifying question, perhaps as a formative assessment, or a check-for-understanding. This will re-establish a sense that you’re figuratively closer to the student.
9. Using shortcuts to avoid distraction
While in a session, things can come up. You may want to take some actions within Zoom. We suggest you take the time to becoming adept at using shortcuts do things like launching a poll, or closing the chat window. This will keep you from having to pause while you search for the controls or buttons to press. In fact, you should consider becoming adept at using the most critical keyboard shortcuts including muting audio, sharing and stopping screen share, and muting video (situations arise where you may need to do this quickly).
Click here to access a list of all Zoom keyboard shortcuts
10. Adjusting settings to optimize video
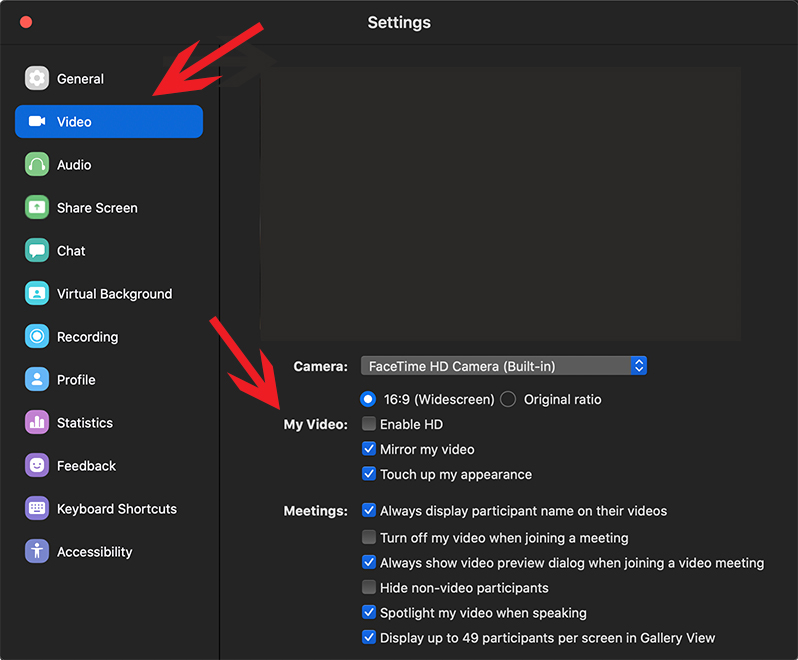
Zoom provides a couple other useful settings to improve your videos. Launch settings and click on the Video option (see image below).
Once there, you will see a heading called My Video. The first suggestion is to click the Mirror my video option. This will eliminate the potential confusion of saying "my left, your right." The participants will see what you see.
Secondly, enable the Touch up my appearance option. This will provide a smoothing effect to your video.
Regarding the Enable HD option, this seems like a good idea but the improvement in video quality is negligible but will increase overall file size for recordings. For that reason, we don't recommend turning on that feature. That said, you're welcome to play around and do some testing on your own. However, if you’re experiencing bandwidth issues or buffering, we encourage you to leave the Enable HD button unchecked.
Mastering these 10 tips for maximizing the quality of your Zoom video meetings will not only make you a more effective distance learning teacher, but will help your students receive your lesson in a more professional and less distracting way.
*Bonus Tip: When you're streaming a live video at 30 fps (frames per second), your computer's camera is taking 30 pictures of you each and every second, then sending them to the processor with instructions to forward the images through Zoom. Zoom uses your processor to send the images to your computer's network card, which transmits the data to its destination. This process requires available CPU resources. To engage in the smoothest possible meetings, close any and all applications you don’t require for the meeting itself.
Comments
0 comments
Please sign in to leave a comment.